

Sunday, June 13, 2010
open for visitors
The Boy Builder and I finished up the walls in his room on Friday. We've also installed a makeshift railing to keep any small people from slipping through the studs. After vacuuming and straightening up, he got started on this project:
 Using scraps from the big build, we made a little table for his room:
 The table will come in handy for playing games, doing puzzles, using the computer, and sharing snacks.
So, make your booking now: The Boy Builder is officially ready for entertaining and hoping for visitors.


So, make your booking now: The Boy Builder is officially ready for entertaining and hoping for visitors.
weather
I have never in my life up until now been so tuned into the weather report. I plan my whole week around it, and the schedule of my crew as well. We don't have specific work hours, but rather try to take advantage of the good weather when it comes, whether a Sunday or a Wednesday or 12 noon or 7pm. It's not uncommon when a friend wants to get together for me to say something incomprehensible like "I'm not really sure when we'll have a free day, but check in with me when the weather is bad — then we might have some free time."
Check out the boy builder's head on Friday:
 If your keen observational skills alerted you there is snow on that beautiful toe-head, you are not mistaken.
Nearly every year we get a June snow, but somehow it still is alarming and disconcerting. Every year. I spent most of this weekend working in a cloud.


Check out the boy builder's head on Friday:

Nearly every year we get a June snow, but somehow it still is alarming and disconcerting. Every year. I spent most of this weekend working in a cloud.


Friday, June 11, 2010
these four walls
We've been framing interior walls! Yippee! All these rooms I've been living in in my mind for so many months and years are finally starting to have real shape in our home.
Today, Eden and I worked together building four walls. I laid out and cut the lumber, he nailed the pieces into a wall, and then screwed the bottom plates to the floor. We both sought advice from James along the way to make sure we were doing it right.


Today, Eden and I worked together building four walls. I laid out and cut the lumber, he nailed the pieces into a wall, and then screwed the bottom plates to the floor. We both sought advice from James along the way to make sure we were doing it right.


i could have danced all night
In preparation for framing interior walls upstairs, we decided to first finish the tongue and groove wood. There were pros and cons to this solution. The pro that ultimately won the argument was that finishing the floor before there were walls there meant we could do it while it was all one open easy space without corners and crevices. The obvious con is that we have to be super careful while continuing to build on a finish surface.
:: We started by cleaning the space completely out and vacuuming carefully (using our fancy Festool vacuum that we're all a little bit in love with).

:: Then we sanded down high spots and repaired any blemishes in the floor we wanted to fix.

:: Once the floor was prepped, we got started with the large upright random orbital floor sander we rented from the local home improvement center. We started with 24 grit paper and worked our way down to 120 grit, vacuuming between each pass. This machine was really terrific. While it definitely took some strength to control it well, you weren't at as much risk of completely ruining your floor like with a drum sander. It also provided a much more even and beautiful surface, got very close to the edge, and still removed material relatively quickly. A great machine.

:: Before applying finish, we also sanded the ceiling of the tower so that the dirt didn't get sealed in.
 :: When the whole surface was prepped, vacuumed thoroughly, and mopped with a tack cloth, the sealer coat was applied. We chose a shellac for its durability, lack of significant color, beauty, non-toxicity, and the fact that it's made of bug excretions. I mean, is there a better reason to use a sealant?

:: While the sealant was being spread in even, gentle strokes from one end of the wall to the other to avoid piling in the middle of the floor, someone else was below on the plastic we used to protect the lower floor wiping up drips.

:: In total, two coats of shellac were applied. Then, the first coat of finish was applied. We opted for a low-VOC water-based polyurethane. It was an operation of forethought and careful coordination to get the urethane applied evenly, without drips, drops, and brushmarks. One person would lead, evenly pouring finish on the floor, and the other would follow with a wide applicator, spreading it from wall to wall, planning a route in advance to allow for a quick getaway down the ladder.

:: In between the 2 coats of finish, we screened the floor, vacuumed, and mopped with a tack cloth yet again.

:: When all was said and done, Eden said the floor looked like gold.

Doesn't this floor just make you feel like dancing?

It was tempting to plan a little hoe-down before we starting building walls upstairs. But, onward and upward! We only admired it long enough for the finish to cure, and then covered it with heavy construction paper to protect it while we continue to work.

:: We started by cleaning the space completely out and vacuuming carefully (using our fancy Festool vacuum that we're all a little bit in love with).

:: Then we sanded down high spots and repaired any blemishes in the floor we wanted to fix.

:: Once the floor was prepped, we got started with the large upright random orbital floor sander we rented from the local home improvement center. We started with 24 grit paper and worked our way down to 120 grit, vacuuming between each pass. This machine was really terrific. While it definitely took some strength to control it well, you weren't at as much risk of completely ruining your floor like with a drum sander. It also provided a much more even and beautiful surface, got very close to the edge, and still removed material relatively quickly. A great machine.

:: Before applying finish, we also sanded the ceiling of the tower so that the dirt didn't get sealed in.


:: While the sealant was being spread in even, gentle strokes from one end of the wall to the other to avoid piling in the middle of the floor, someone else was below on the plastic we used to protect the lower floor wiping up drips.

:: In total, two coats of shellac were applied. Then, the first coat of finish was applied. We opted for a low-VOC water-based polyurethane. It was an operation of forethought and careful coordination to get the urethane applied evenly, without drips, drops, and brushmarks. One person would lead, evenly pouring finish on the floor, and the other would follow with a wide applicator, spreading it from wall to wall, planning a route in advance to allow for a quick getaway down the ladder.

:: In between the 2 coats of finish, we screened the floor, vacuumed, and mopped with a tack cloth yet again.

:: When all was said and done, Eden said the floor looked like gold.

Doesn't this floor just make you feel like dancing?

It was tempting to plan a little hoe-down before we starting building walls upstairs. But, onward and upward! We only admired it long enough for the finish to cure, and then covered it with heavy construction paper to protect it while we continue to work.

geometry
Remember all that math you did through high school that, depending on the method of instruction you encountered, you always wondered what use it could possibly be in real life? Well, I think the local high schools should get the trigonometry classes out building a house. I use basic arithmetic, geometry, trigonometry, and even a bit of light algebra on a near daily basis.
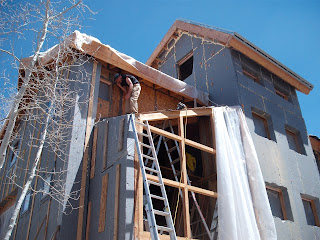
We've still be applying foam to the house, waiting, as per usual, for a dry spell with warm temperatures. Tuesday I put the foam on this crazy triangle wall above the greenhouse and put my 3-dimensional geometry skills to the test.
Here are the criteria I was working with:
We started by putting a temporary "roof" on the greenhouse so we had something to stand on.
Then we measured and marked and cut with the wire cutter and dry fit. Miraculously, after the kinks were worked out with the first course, my other pieces fit perfectly on the first go! I was giddily proud.
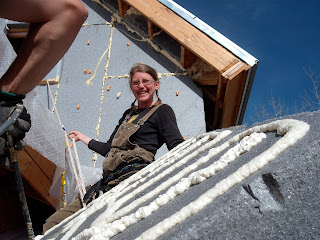
Then we glued and screwed nailer boards on, all while standing precariously on the compound pitch roof. (My feet and lower legs got sore up there!)
Here's the wall section when all complete:

If your math skills are in need of a little brush up, build something! you don't have to jump right in with a house. Maybe a garden box, a sandbox, a pea shooter for your nephew, a spice rack for the kitchen, or you could get fancy with a tool shed. You'll be so glad you did.
We've still be applying foam to the house, waiting, as per usual, for a dry spell with warm temperatures. Tuesday I put the foam on this crazy triangle wall above the greenhouse and put my 3-dimensional geometry skills to the test.
Here are the criteria I was working with:
- The wall is a triangle
- The foam is 8 inches wide, so I have to take into account the front and back dimensions
- The roof above is at a 5/12 pitch
- The roof above has rafter tails coming through that must be notched for
- The roof of the greenhouse has a compound angle of 22° in the north-south axis and 25° in the east-west axis
- We had to cut out one window opening in the little wall
- I was using funny end pieces of foam that I had to piece together
We started by putting a temporary "roof" on the greenhouse so we had something to stand on.

Then we measured and marked and cut with the wire cutter and dry fit. Miraculously, after the kinks were worked out with the first course, my other pieces fit perfectly on the first go! I was giddily proud.
Then we glued and screwed nailer boards on, all while standing precariously on the compound pitch roof. (My feet and lower legs got sore up there!)

Here's the wall section when all complete:

If your math skills are in need of a little brush up, build something! you don't have to jump right in with a house. Maybe a garden box, a sandbox, a pea shooter for your nephew, a spice rack for the kitchen, or you could get fancy with a tool shed. You'll be so glad you did.
Monday, June 7, 2010
a little more than sunkissed
The weather on our mountain sometimes reminds me of the weather I remember on the Tibetan plateau. One moment it's sunny and 70 degrees and the next it's sleeting and 40 degrees.
Less than one week ago I was in my "spring" attire to be comfortable: insulated coveralls, long underwear pants, long underwear shirt, long sleeved shirt, and hat. Today, it was roasting hot at 70 degrees and sunny and despite several sunscreen applications, I got a sunburn on my newly exposed skin. I just applied the aloe.
Then, tonight, a thunderstorm rolled in to shake things up a bit. As we were racing to replace the tarp over the greenhouse, we got drenched and wound up having to mop and vacuum up 100 gallons or so of rainwater out of the house at 9 o'clock at night before we headed home.
Don't get me wrong, I'm all for summer's arrival, but I do wish it had arrived with slightly more warning.
Saturday, June 5, 2010
then and now
Every now and then when I get to feeling frustrated with the pace of our building project, it helps to reflect on how far we've come.
One year ago yesterday, this is what we had constructed so far at our building site:


 That's the formwork for our basement concrete walls. You'll note there is no snow on the ground and the aspens are starting the leaf out. Later, after pouring the concrete, we painstakingly took down all the lumber, stacked it, and later used it to build the rest of the framed house.
This is what our home looked like yesterday morning:
 There's a lot of progress represented in one year here. Mixed in with all the lumber, steel, concrete, polystyrene, and silica in this home is a lot of love, blood, sweat, tears, a whole year of growth for all of us, muscles and skills developed and honed, decisions made, accomplishment and loss, dreams and hopes for the future of our family.
In fact, our home which just one year ago looked like not much at all now looks like a home. While the pace of our project can't match a production home in a flat development in a city without so much snow, I feel like we've made a lot of forward progress in this year. A lot to be proud of.
It's a treat to have such physical evidence of the labors my family has made in the past year, but there are so very many ways that families grow and develop. How has your family moved forward this past year?
One year ago yesterday, this is what we had constructed so far at our building site:


This is what our home looked like yesterday morning:

In fact, our home which just one year ago looked like not much at all now looks like a home. While the pace of our project can't match a production home in a flat development in a city without so much snow, I feel like we've made a lot of forward progress in this year. A lot to be proud of.
It's a treat to have such physical evidence of the labors my family has made in the past year, but there are so very many ways that families grow and develop. How has your family moved forward this past year?
this week
I'm in manic building mode. I want to move into our house so very badly and we are, believe it or not, closer than we ever have been. I've been at the building site for 12 hours a day nearly every day this week.
:: We been tracing curvy walls
 :: And cutting and sanding curvy walls
 :: We've been laying out bottom plates for the upstairs framing
 :: We've been building funny little wall and roof sections to close in the greenhouse and connect it to the rest of the house
 :: We've been continuing to install grey foam on the east and west sides of the tower
 :: We've cleaned up the site a bit as the snow melts


What all these photos don't capture are the thousands of times I've climbed up and down the stairs and ladders, the dozens of times we've walked in and out of the site, the many tubes of caulk we've spent, the hundreds of pounds of heavy tools and materials I've lifted and hauled, the number of times I've gone slightly tachycardic climbing 22 feet in the air on ladders or skittering across planks of scaffolding, or the hundreds of little decisions that have been made. It's tough work, this house-building business.
:: We been tracing curvy walls


:: We've installed more windows

:: We've played in the mud

What all these photos don't capture are the thousands of times I've climbed up and down the stairs and ladders, the dozens of times we've walked in and out of the site, the many tubes of caulk we've spent, the hundreds of pounds of heavy tools and materials I've lifted and hauled, the number of times I've gone slightly tachycardic climbing 22 feet in the air on ladders or skittering across planks of scaffolding, or the hundreds of little decisions that have been made. It's tough work, this house-building business.

Here's to another productive week.
Thursday, June 3, 2010
green building 101: windows
{This is the second installment of a feature called Green Building 101 where I cover a topic in green building in more depth. Since a lot of my time lately has been spent thinking about, talking about, and working with windows, that's the topic of this article.}
Windows serve two main functions in a building: they let in light and they ventilate. In addition, windows can be an important part of the solar heat gain in a passive solar house, and can also be a beautiful addition to the architectural design of a building.
In general, the functions of letting in light and ventilating are at odds with the primary function of the building as a whole — to keep the occupants comfortable, dry, and secure, protected from the elements of the outdoors that defines the reason why any of us live in buildings. Windows are at odds, because at their very essence, they are essentially holes in the walls of the building.
Historically, windows literally were holes in the walls. They might be covered with a curtain of fabric, glazed with paper, or covered with wooden latticework. But, rain, snow, cold, wind, critters, and bandits could still get in. Wooden shutters were used to lock out unwanted intruders, but had to be opened when light and fresh air was wanted in or smoke out.
It wasn't until the Middle Ages that the technology became more widely available to make sheets of glass to cover windows, and not until much later that this technology became widely available to regular homeowners. Glass was a major technological breakthrough in windows because it kept out many of the unwanted elements while still letting in light, and operable sashes could be made to hold the glass that allowed the window to open for ventilation and lock closed as desired.
In modern times, window technology has advanced dramatically from the earliest days of glazing, allowing windows to be not just the holes in the walls they once were, but insulating, solar heat gaining, ventilating contributors to the heating and cooling systems of the building.
Structurally, windows are made up of two main components: a frame and an insulated glass unit (IGU). The IGU is composed of the panes of glass, the air in between the glass panes, and the spacer that holds the whole thing together. Commonly available IGU configurations are 2-pane, 3-pane, and 2-pane with a heat mirror film, which functionally acts as a 3-pane or 4-pane window. The IGU is the part of the window that lets in light and heat, and contributes to the insulating qualities of the window. Well-made IGUs have the following characteristics:
At the high elevations in our area, it's nearly impossible to get inert gas filled IGUs, as the IGUs are manufactured at a lower elevation and transported up. Pressure release valves must be built into these IGUs in order to prevent the bulging of the IGU that would happen if a sealed window were transported to a higher elevation with lower air pressure. The gas inside the window expands at the higher air pressure and the gas must move somewhere. Because all the inert gas winds up escaping through the pressure release valve, inert gas is not used in our market except by one known manufacturer with a special balloon compensator system for keeping the inert gas inside the IGU.
The spacer that is used to construct the IGU is often made of steel, a relatively good thermal conductor, which is not so good for the window as the spacer then carries outside temperatures in, all around the perimeter of the glass. Some manufacturers use composite materials that are more insulating which makes for a better performing window. In any case, it's important that these IGUs are sealed properly to prevent condensation between the panes, a problem in poorly constructed windows.
Special transparent coatings — "Low-E" being the most well known of them — can be applied to any of the surfaces of the glass unit to increase the insulating factor or U-value of the window, and increase or decrease the solar heat gain of the glass, depending on the energy design of the building.
Window frames are the structural component that bears the engineering load of the window. It also is used to attach the window to the building, holds the hardware for operable units and security, and contributes to the insulating properties of the window. Frames are made of all kinds of materials including wood, aluminum, vinyl, and fiberglass. For an energy efficient house, well-made frames have the following characteristics:
Windows serve two main functions in a building: they let in light and they ventilate. In addition, windows can be an important part of the solar heat gain in a passive solar house, and can also be a beautiful addition to the architectural design of a building.
In general, the functions of letting in light and ventilating are at odds with the primary function of the building as a whole — to keep the occupants comfortable, dry, and secure, protected from the elements of the outdoors that defines the reason why any of us live in buildings. Windows are at odds, because at their very essence, they are essentially holes in the walls of the building.
Historically, windows literally were holes in the walls. They might be covered with a curtain of fabric, glazed with paper, or covered with wooden latticework. But, rain, snow, cold, wind, critters, and bandits could still get in. Wooden shutters were used to lock out unwanted intruders, but had to be opened when light and fresh air was wanted in or smoke out.
It wasn't until the Middle Ages that the technology became more widely available to make sheets of glass to cover windows, and not until much later that this technology became widely available to regular homeowners. Glass was a major technological breakthrough in windows because it kept out many of the unwanted elements while still letting in light, and operable sashes could be made to hold the glass that allowed the window to open for ventilation and lock closed as desired.
In modern times, window technology has advanced dramatically from the earliest days of glazing, allowing windows to be not just the holes in the walls they once were, but insulating, solar heat gaining, ventilating contributors to the heating and cooling systems of the building.
Structurally, windows are made up of two main components: a frame and an insulated glass unit (IGU). The IGU is composed of the panes of glass, the air in between the glass panes, and the spacer that holds the whole thing together. Commonly available IGU configurations are 2-pane, 3-pane, and 2-pane with a heat mirror film, which functionally acts as a 3-pane or 4-pane window. The IGU is the part of the window that lets in light and heat, and contributes to the insulating qualities of the window. Well-made IGUs have the following characteristics:
- \Relatively large air space
- Inert insulating gas filling the air space
- A well-sealed, non-thermally-conductive spacer
- Special coatings on the glass that enhance the insulating and solar heat gain properties of the window
At the high elevations in our area, it's nearly impossible to get inert gas filled IGUs, as the IGUs are manufactured at a lower elevation and transported up. Pressure release valves must be built into these IGUs in order to prevent the bulging of the IGU that would happen if a sealed window were transported to a higher elevation with lower air pressure. The gas inside the window expands at the higher air pressure and the gas must move somewhere. Because all the inert gas winds up escaping through the pressure release valve, inert gas is not used in our market except by one known manufacturer with a special balloon compensator system for keeping the inert gas inside the IGU.
The spacer that is used to construct the IGU is often made of steel, a relatively good thermal conductor, which is not so good for the window as the spacer then carries outside temperatures in, all around the perimeter of the glass. Some manufacturers use composite materials that are more insulating which makes for a better performing window. In any case, it's important that these IGUs are sealed properly to prevent condensation between the panes, a problem in poorly constructed windows.
Special transparent coatings — "Low-E" being the most well known of them — can be applied to any of the surfaces of the glass unit to increase the insulating factor or U-value of the window, and increase or decrease the solar heat gain of the glass, depending on the energy design of the building.
Window frames are the structural component that bears the engineering load of the window. It also is used to attach the window to the building, holds the hardware for operable units and security, and contributes to the insulating properties of the window. Frames are made of all kinds of materials including wood, aluminum, vinyl, and fiberglass. For an energy efficient house, well-made frames have the following characteristics:
- They are well sealed to the IGU to prevent moisture and air infiltration
- They are insulated and made of insulating materials
- They are durable and beautiful for a long time, support the sash and IGU, and operate smoothly
Good window frames feel solid and durable and operate well. The best ones have insulation through the middle and the glass is wet-glazed in the sash.
If you're building a new house, you've got a huge number of choices for windows and it's worth shopping around. Perhaps even do an energy model of your home to see how well various windows will perform and what the return on investment will be on higher end, more energy efficient windows.
If you have an existing home and a budget for replacing old, leaky windows, an energy model is a good idea again to make sure you're buying the best window for your dollar and that it matches the aesthetic and performance characteristics of the rest of the house.
In any case, new or old, make sure that windows are installed properly. Use a bituthane tape around the window opening to prevent water from penetrating, caulk around the entire window frame before install, and use a sealant like low expansion foam or EPDM gasket to fill any cracks around the window. If the windows in your existing home are drafty and sweating, sometimes repairing the install job is a good first step to improving their performance even without replacing them altogether.
Most of all, make your windows work for you and enjoy the views and the sunshine they bring into your home.
Wednesday, June 2, 2010
surgery
There are hazards in this Mama Builder line of work.
Monday I was hauling large quantities of lumber and got a big splinter caught in my right palm. Yesterday morning there was still a chunk of wood caught in my palm. I got out what I could on my own, but had to enlist the services of the on-site surgeon to help me get out the rest.
Some alchohol pads, a utility knife, and light pouring in through the greenhouse wall made for the OR.

Deep breathing played its role and I got through without even a slug of whiskey for my pains.
On to framing!
Tuesday, June 1, 2010
mud season
Around here, we don't really get spring, per se. Just mud season, which really is mostly rapidly melting snow season with a bit of mud before the plants get their green on. And it happens no where near in time to the spring equinox on March 21.
We're just now finally melting off our snow after a seemingly never-ending barrage of late-season storms. If this year is anything like other years, we haven't seen the end of snow fall yet for the year — there's always at least one snow fall in June — but we are officially in the spring melt off.
Our comparatively ugly springs are a sort of sacrifice for stunning, perfect, wildflower filled summers, flaming autumns, and powdery winters, so we live with it. And some of us revel in it.

Subscribe to:
Comments (Atom)


